
Chalk Paint trail and Hope Chest makeover
9:28 AMThat's right... hitch me up... I'm joining the chalk paint bandwagon.
After hearing for MONTHS about the glory of chalk paint, I have been perusing garage/yard/estate sales and Craigslist for a piece I could experiment on.
This last weekend, for $20, I finally found my guinea pig.


Come to find out, it is a VERY nice brand and cedar chest like the one I found are going for $300+ on Amazon!!!

But what really drew me to this piece, was the uber cool handles on the front.

Even though they were already a dark bronze, I figured it would be best to spray paint them to give them a total uniformed look


Now that the handles were off, I was finally able to take a step back and really look at the bones of this sucker.


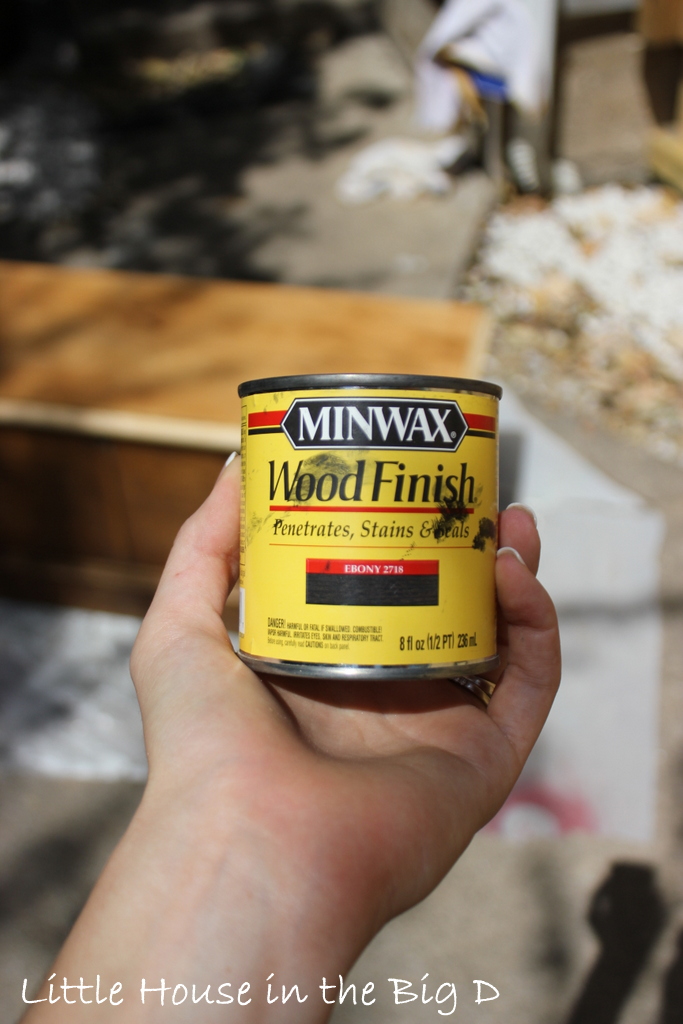
To make the piece stand out a little more than having JUST paint on it, I decided to give the top new life with a nice dark stain.
Word to the wise, ALWAYS use Pre-stain...


After giving that about an hour to dry and set, I decided to go with a deep "Ebony" stain to give the piece some drama (and what type of chest would it be without Drama?!)

I had read some links on pinterest that said if you plan to shabby chic your piece (which I was) to paint over the areas you want an accent color showing through... I kept it simple and went with a black.


Now comes the fun part! CHALK PAINT!!
I did a little research on my end and found there are many, many, MANY different recipes for chalk paint, but with a little tinkering, this is what worked for me:

 |
| I bought this one with a 50% off coupon at Joanns for only $3.49 |

 |
| For all those worried, I thoroughly cleaned these after using them and are now "craft only" containers |
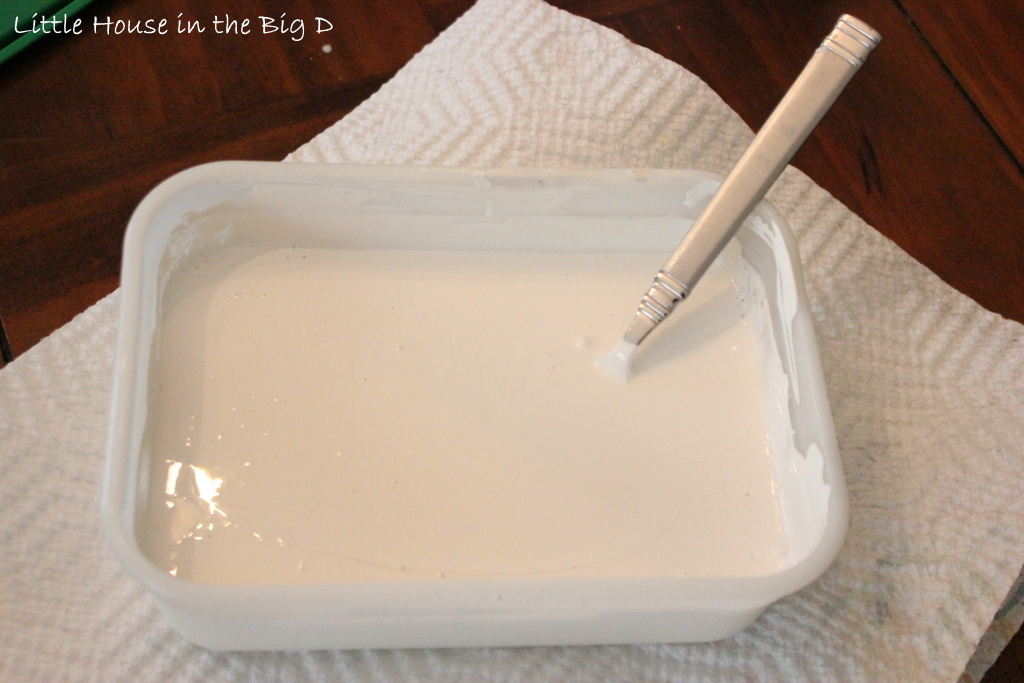
Make sure everything is good and mixed in. Take you time. You will start seeing the paint get thicker and thicker.
The thing I was looking forward to the most while experimenting with chalk paint was the whole "no primer necessary" claim.


After I applied everything and let it dried, I was TOTALLY loving what was starring back at me.


 |
| I used a high 200 grit sandpaper |
After I finished, I reattached the handles and took a step back to admire the finished piece.


-Samm


22 comments
Just curious why you would use chalk paint on the body of the trunk? I assumed when you said you were trying out chalk paint that you meant on a piece that was to be written on - like the top of the chest for kids' playroom, etc. Is the chalk paint you used different than the chalk paint that they sell in stores for message boards, etc. or can your recipe be used for that purpose? Turned out beautifully!!
ReplyDeleteTracy, Thanks for your question! I know the name "chalk paint" can get a little confusing but "chalk paint" is actually MUCH different than "chalkboard paint" (which is what I think you are thinking of). You do not write on chalk paint (as you would with something covered in chalkboard paint). Chalk paint is a new form of paint (kind of like Milk Paint) that has many uses besides just being paint and help achieve different looks (white wash, shabby chic, adding texture, etc). Its a thicker type of paint which does not require the usual prep-work that comes with painting most pieces.
DeleteThe most famous chalk paint out there is called Annie Sloan Chalk Paint... here is her website that details the advantages of chalk paint a little better: http://www.anniesloan.com/acatalog/copy_of_How_to_use_the_paint.html
Take a look! Its a new trend out there and I am fully on board! Hope this helped! Thank you for stopping by!
-Samm
It's beautiful!
ReplyDeleteIt looks so good!
ReplyDeleteChalk paint has a flat finish right? Do you think it would get scuffed easily?
It was so nice to meet you Saturday! I love your blog and look forward to another DFW blogger gals night out ;-)
ReplyDeleteNice work! I’m in love with that piece. I’ve never used a chalk paint, but now I want to!
ReplyDeleteIt was really great to meet you on Saturday!
Looks great!
ReplyDeleteI love your piece! You didn't say what finish the paint was. Was it flat, egg shell, gloss? Also, I've seen on some blogs that people then put a coat of either the Annie Sloan soft wax or the cheaper version MinWax finishing wax over the chalk paint when all finished sanding. You didn't mention it so guess you don't have too??? I have a 30 year old hope chest that looks a lot like the one you finished. You have inspired me and looks like that will be my next project. Thanks!
ReplyDeleteI love, love, love it! So much that i "stole" your idea, including the chalk paint recipe, and did a little project of my own, with small changes :) Thank you for a great and inspiring idea (not the only one i liked from you!)
ReplyDeleteAnnie Sloan feature's a DIY kit of three quarts paint, both waxes, the wax brush and a pamphlet for around 198 dollars. I am thinking about purchasing it, what do you think? Shelley T
ReplyDeleteThis is a beautiful DIY. Totally inspiring!
ReplyDeleteCurious...did you sand down the body too? I'm starting almost the exact same project this weekend
ReplyDeleteHi there! Just wanted to thank you so much for your step-by-step tutorial. I used it all the way through finishing my own hope chest all the way down to your chalk paint recipe and the ebony stain. Love how mine turned out! http://imgur.com/NH3Cmm0
ReplyDeleteWhether somebody pursuit of his vital thing, hence he or she desires to be accessible that at length, hence that thing is maintained over here. TreeServiceinGreenvilleSC
ReplyDeleteSuper-Duper blogs! I love it really!! Would come back to visit soon, again Thanks. flood damage repairs
ReplyDeleteChristian Louboutin Bois Dore, christian louboutin remise 50%, Discount Louis Vuitton, christian louboutin shoes, wholesale jordan shoes, ugg boots, ugg soldes, discount nike jordans, cheap christian louboutin, uggs on sale, Cheap Louis Vuitton Handbags, ugg australia, uggs outlet, Air Jordan 11 Gamma Blue, discount christian louboutin, Discount LV Handbags, christian louboutin, Cheap LV Handbags, ugg pas cher, Bags Louis Vuitton, Christian Louboutin Daffodile, ugg, cheap jordans , cheap nike jordan shoes
ReplyDeleteشركة تنظيف فلل بالرياض
ReplyDeleteشركة مكافحة حشرات بالرياض
شركة تخزين اثاث بالرياض
شركة تنظيف بالرياض
شركة كشف تسربات المياة بالرياض
شركة تنظيف بالمدينة المنورة
شركة تنظيف كنب بالمدينة المنورة
شركة تنظيف بالرياض
شركة تنظيف منازل بالرياض
ReplyDeleteشركة تنظيف مجالس بالرياض
شركة تنظيف بالدمام
شركة تنظيف خزانات بالرياض
شركة نقل عفش بالمدينة المنورة
شركة الصفرات للتنظيف
شركة الصفرات لمكافحة الحشرات بالرياض
شركة تنظيف بجدة
شركة مكافحة حشرات بالدمام
شركة مكافحة حشرات بجدة
شركة تسليك مجاري بالدمام
شركة تخزين عفش بالرياض
شركة مكافحة صراصير بالرياض
شركة مكافحة البق بالرياض
شركة تنظيف بالمدينة المنورة
شركة مكافحة حشرات بالمدينة المنورة
ReplyDeleteشركة تنظيف مساجد بالرياض
شركة تخزين عفش بالرياض
شركة تنظيف منازل بالمدينة المنورة
شركة تنظيف خزانات بالمدينة المنورة
شركة غسيل خزانات بالمدينة المنورة
شركة تنظيف فلل بالرياض
شركة تنظيف كنب بالمدينة المنورة
شركة تنظيف بالمدينة المنورة
شركة تنظيف فلل بالمدينة المنورة
شركة تنظيف منازل بجدة
شركة تنظيف شقق بجدة
شركة تنظيف شقق بالمدينة المنورة
شركة نظافة بالدمام
شركة تنظيف مجالس بالمدينة المنورة
شركة تنظيف خزانات بالمدينة المنورة
شركة غسيل خزانات بالمدينة المنورة
تنظيف فلل بالرياض
ReplyDeleteشركة مكافحة حشرات بالرياض
شركة مكافحة الصراصير بالرياض
مستودعات تخزين اثاث بالرياض
شركة تنظيف خزانات بالرياض
شركة غسيل خزانات بالرياض
شركة كشف تسربات المياة بالرياض
شركة كشف تسربات بالرياض
شركة نقل اثاث بالرياض
افضل شركة تنظيف فلل بالرياض
شركة تنظيف بالرياض
شركة تنظيف شقق بالرياض
شركة كشف تسربات بالرياض
شركات مكافحة الحشرات بالرياض
افضل شركة مكافحة حشرات بالرياض
شركة رش مبيدات بالرياض
شركة تسليك مجاري بالرياض
ReplyDeleteشركة مكافحة النمل الابيض بالدمام
شركة عزل خزانات بالدمام
شركة تسليك مجاري بالرياض
شركة مكافحة النمل الابيض بالرياض
افضل شركة عزل خزانات بالرياض
شركة تنظيف بالرياض
شركة تنظيف بالرياض
شركة النقاء
شركة تنظيف بالمدينة المنورة
شركة تنظيف منازل بالمدينة المنورة
شركة تنظيف شقق بالمدينة المنورة
شركة رش مبيدات بالمدينة المنورة
شركة تنظيف فلل بالرياض
شركة مكافحة حشرات بالرياض
افضل شركة مكافحة حشرات بالرياض
شركة مكافحة حشرات بالمدينة المنورة
شركة مكافحة النمل الابيض بالمدينة المنورة
شركة تنظيف خزانات بالمدينة المنورة
اعاهلا بيكم في مجموعة السعودية للخدمات المنزلية حيث نقدم لكم مجموعة رائعه من افضل الخدمات بمجموعة الرياض نقدم عدة وظائف واعمال منها شركة نقل الاثاث وهي الخدمة الاشركة كشف تسربات المياه بالرياض
ReplyDeleteشركة تنظيف بالرياض
كما نقدم عروض جديدة للمنازل في جدة اتصلوا بنا علي شركة الادهم 01017782812
Comments make my heart happy... and I read every ONE of them... thank you so much for taking time to make my day!