DIY Nate Berkus vase

5:27 PM

Yep... I did it... For $6, I copied Nate Berkus...

 Seriously, who doesn't LOVE Nate Berkus... no one? Everyone loves him? Yea, that's what I thought... Cute, funny, good-looking, smart, stylish, creative, sexy, handy, and home decor God (...did I mention he's handsome?) everyone wants a piece of this man!!! (Except for me... because I'm married... happily married... ... ... ... love you hunny... ... .... ...)

So it should come to no surprise that when Nate (we are on a first name basis) came out with his collection for Target, many of us (aka. Young House Love, Bower Power, and about a million/billion other Americans) flocked to our local red and white store to score some of the action.

They only sad part about said "action", is that "pieces of Nate" can be somewhat expensive some times.  Enter this vase/hurricane I found as part of his collection that I just fell in love with...
 Simple, but a nice neutral texture that would look great with candles, pine cones, etc... I wanted it... that was until I saw that it was $25.... for one.
Also found HERE on Target.com
Don't get me wrong, it was very cute, but spending $50 on two Target vases just wasnt going to happen for me.  So I took a picture and decided to see if I could make one myself.

All the components seemed pretty simple, so I swung by Lowe's to see what I could find.

Enter this rope I scored this rope for only $0.48 a foot.
 It was a bit thicker than the Nate Berkus one, but I still loved the rustic feel and snagged 10ft of it. (Important side note: What I SHOULD have done before cutting/buying the rope was measuring the vase I would be covering then buying the rope to size.  When I got home with my 10ft, it was way too long and way to thick to cut myself.  I had to go back to Lowe's for them to cut it for me!  I only really needed about 7ft)

By the time I got home to start my project, I wanted to make sure the ends wouldnt start fraying (it IS twine rope afterall) and decided the best, most invisible sealer would be a polyurethane (which is normally used to seal stained wood pieces)
 I dunked my ends in the can and let them soak for about 3 minutes to really get a good coat
I made two vases which is why there are 4 rope ends
 And let them fully dry for 1-2 hours.
I used an unopened ikea frame since I knew I would be throwing the plastic packaging away anyway.
 After everything was dry, I readied my vase (on sale from Michaels) and hot glue gun.
 Flipping the vase over, I started hot gluing the rope to the vase and wrapping it around. 
 After the base-wrap was set, I was able to put it on its side and continue wrapping.
 Again, I used 7ft which got me a little past 1/3 of the way up the vase once everything was glued into place.
 Cute so far, huh?!
 Next, I used some leather bracelets (found at Michaels) for the straps.
 Here's a closer look of the exact brand if you are interested.
 I cut off the bracelet holes and metal button which just left me with a plain leather strap.
 Again, using my hot glue gun, I set it into place.
 For the little cute decorative buttons Nate used on his vase, I used some old Upholstery Nails left over from my painted chairs project.
 For those of you who don't have these laying around the house, I bought these from Home Depot - $1.29 for a 20pc box.

I thought these would be great and easy to just push through my leather strap, but I guess the leather I used was just too thick because they would NOT go through... Plan B? Go back to the glue gun (ALWAYS go back to the glue gun).

So I used some pliers to cut off the ends...
 And hot glued the suckers into place.
 Warning: the hot glue gun didn't hold on as well as I would have hoped and it was a bit tricky to get them to stay (even though they eventually did).  If hot glue doesn't work for you, try Gorilla glue and hold them in place for 5 minutes while it dries.

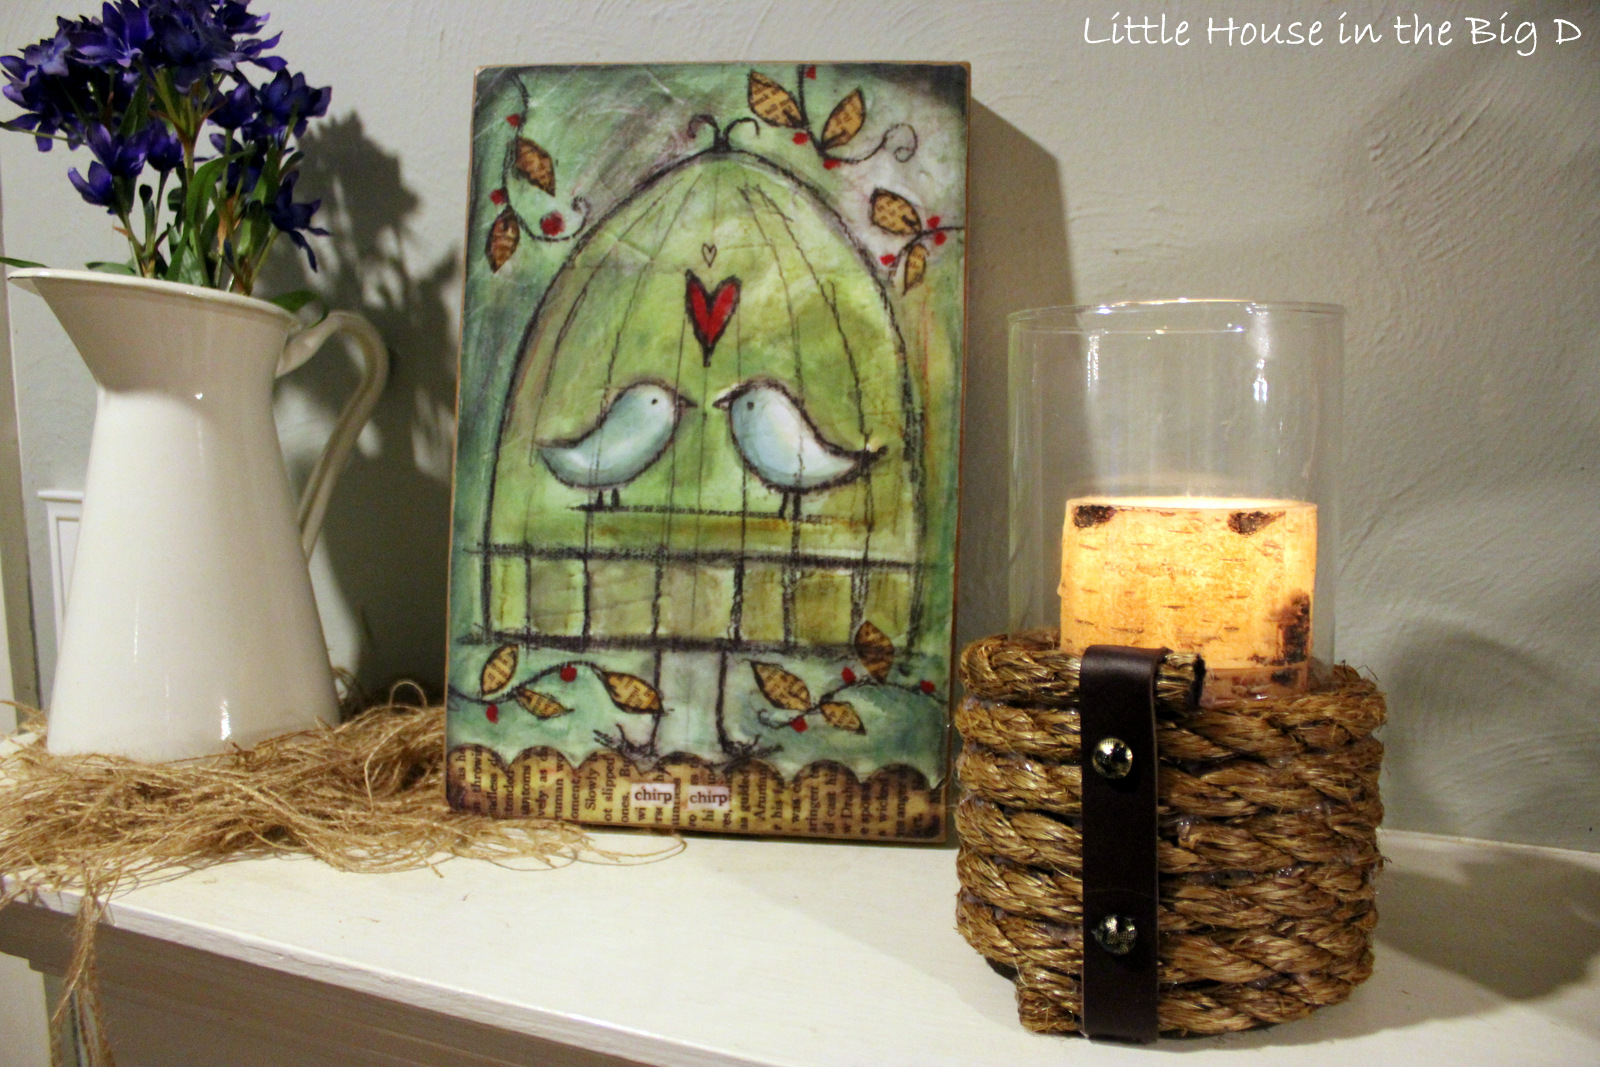
After everything set, I popped in a last-year's-clearance Pottery Barn candle, lit her up, and stood back...
 Ummm I love it... seriously. Like singing birds and floating hearts love.

Originally, I put it up on the mantle for all to see (ie. "Hi, did you guys see what I made? I made this. Isnt this cute? Oh, I should take a picture of it and send it to everyone in my phone? ok, great, awesome idea..."
 But eventually moved them over to our new buffet in our dining room.
Project photos of this to come soon.  GREAT garage sale find turned Pottery Barn chic...
 Oh, and like I said, I got those candles last year at Pottery Barn on super clearance.  They were a couple different sizes so I added some burlap at the bottom of the vase so you could see the smaller ones better.
 Here is a breakdown of what this project cost per one
-6ft section of rope from Lowes - $2.88
- Clear vase/hurricane from Michaels - $2.00 (after 50% off coupon)
- leather bracelet strap from Michaels - $1.00 (after 50% off coupon)
- decorative tac - already owned ($1.29 for 20 if you need to buy them)
- Hot glue gun and glue - already owned ($5.00 if you need to buy one)
TOTAL: $5.88 per vase

So for less than $12.00 I saved $38.00 for making my own Nate Berkus vase/hurricane... and I love them.

Have you guys ever tried to copy something that you have seen in a store or thought to yourself "I could make that?".... Cause now everything I see, Im pretty sure I can make "$199.99 for a pair of boots? I should just take a shoe making class..."..... ... ... ... this could be the start of something terrible.

-Samm


All You Need Is Love

10:07 AM

In addition to being one of my favorite Beatles songs, "All you need is love" is also a very good mantra to live by, especially when looking for furniture/objects to fix up.

Although something might look a little rough, a little dirty, a little Gary Busey circa 1995, with a little love and celebrity rehab attention something really can be given new life.

For example, take this bench I found outside a garage sale.

Notice how I say "found OUTSIDE a garage sale".

"Technically" it was not for sale.  "Technically" it was just being used as a door stop for these people's back fence to direct garage salers back to their garage.

However, I thought it had good bones and I loved the crisscross cast iron backing so I thought I would ask, just for the hell of it. 

First, the lady said it wasn't for sale... then on second thought, she asked her husband who said it was up to her (smart man) and next thing I knew, I was the proud new owner of a cute little bench for $10.

Thinking this would be an "easy" sand-down-and-stain project, I took it home and started to work on its therapy rehab.
 First step was taking off the super heavy cast iron backing.

And then this happened.
 The elements had not been kind to this little bench, and the joints inbetween the backings had become completely dependant on the cast iron to hold it in place.

Taking one problem at a time, I decided to carry on with my original plan and spray paint the backings to make them look all shiny and new.
Thinking this piece would look really cute and lively with a new stain, I got to work sanding it down, using a super low grit paper.
 When I got to the joints, I used a mix of Elmer's Super Duty Wood Glue and Elmer's Wood Putty to set the sucker back in place.
 Not perfect, but not broken either!

After about 1.5 HOURS of sanding I was pretty deep into the wood, but still not to wood-staining quality.
 That, mixed with my junky joints, made me reevaluate my staining choice and I instead opted for something a bit easier... Spray paint... Oregano by Rustoleum, to be exact.
 Not to shabby!
 After I put the backings back on, I was liking what I saw...
 Looking like Britney Spears with a new hair weave, it was time for this lady to make her showcase into the world... aka on our deck.

It actually turned out to be perfect timing since our rocking chairs that I remade (as remembered here) helped me remember one VERY important lesson... Polyurethan.

Yes, we did get to enjoy our rocking chairs on our deck for a few months...
Those cups had water in them and Im pretty sure we were discussing politics... ... ...
But sadly, with rain and our super hot summer, it warped the wood and much of the back falling apart.

Technically, it was a $70+ lesson on what I should have used in the first place...
Outdoor Polyurethane!!!... it even says it right on the can! "Protection from: Sunlight, rain & moisture, and temperature changes"

So you can bet I covered my new lovely lady in it before setting her in back into place...
Here's how she looks now with the Pottery Barn table set we got as a wedding gift.
And a cute little white fluffy pup just for kicks...
Its eclectic and a bit different, but still goes!  I also love the extra seating (especially now that its cooling down in Texas and we can actually use our deck again!)

Here's the before and after for ya.
Yea, not bad for $10, huh? (plus some sanding, wood glue, and spray paint)

Have you guys had any garage sale scores that just needed a little love? Have you ever made an expensive little mistake that cost you the project (our rocking chairs were recently donated to our front curb for Dallas Bulk Trash Pickup... ... they were beyond saving... so sad... I sang Ave Maria as they were taken away).  I would love to hear from you!
-Samm

Auction Finale - We bought stuff!!!

9:59 AM

Yes, Its true!! After attending the Dallas based Marble and Granite Auction 8x and only buying one thing the entire time (our 3x6 travertine pavers as remembered here, and installed here and here) we finally took the plunge and bought our supplies to redo our kitchen and bathrooms!!!

 I know I haven't really said much about actually taking the steps to redo three of the most outrageously ugly rooms in our house, but that's because we have been saving, scrounging, rubbing our pennies together, and eating Top Ramen for the past several months to be able to finally afford "thinking" about taking the necessary steps to redo our kitchen and baths.   Well, that and the fact that our kitchen flooded over Memorial Day weekend (I promise I will post about it... I was home alone when it happened and even looking at the pictures make me kinda nervous)... here's a quick preview though.
Please feel free to picture me crying and leaving Chris sobbing voicemails begging him to come home
ANYWAY, with all that being said and a little bit of homeowners insurance money in our pockets, we got a postcard in the mail a couple weeks ago from our good friends at the Marble and Granite Auction place saying they would be having their LAST auction here in Dallas on 11/11/12.  I guess attendance has been less than steller here in the Dallas area so they have decided to close their auctioning doors (they still do other auctions across the country and in TX...)

We have been to these auctions a couple times before, but knowing that this was the LAST auction and that it was either now or never made us a little nervous.  So we went up this past Saturday and previewed what they would be auctioning, HOPING that we would find something that would work for what we were thinking (FYI - you get what you get at these auctions... every time is different, so you can't really count on what you've seen before because it could be gone).
 One of the things Chris and I both REALLY liked last time was some Marble countertops we thought would be beautiful for the kitchen and as a bathroom vanity... Good News - they had them again at this auction!!
 Bad news - they only had two... (waaa-waaa)... so Marble for the kitchen was definitely out.

Chris and I are pretty go-with-the-flow people so we gave the marble one last sigh, and moved on...

Right into the arms of this lovely lady...
It looks a little pink in this picture, but I promise that is just the warehouse lighting
 Granite Counter tops... 26x84... Almond Mauve.... (Cinderella's music "So this is love" started mentally playing in the background).

Chris has always been a super big fan of granite where as I always want something a bit more different and unique.  The fact that I have never seen Almond Mauve and that is wasn't a super popular color (at least from what Ive seen around Dallas) made us both fall in love.

Also, bonus point, it had travertine tile backsplash right next to it which complimented it wonderfully.
 Oddly enough, Chris and I both had a crush on the same back splash... the honeycomb mosaic.
 We also brought a couple broken pieces of our future kitchen flooring (the 3x6 travertine pavers... already found in our sunroom and laundry room)
 We carried around both backsplashes to some other granite slabs around the warehouse but nothing seemed to go quite as well as the Almond Mauve.
 However, with our granite picked out for the kitchen, it still left us needing something for the bathroom vanity (we are having a base vanity made by the same guy making our kitchen cabinets!! Again, more details to come...).  True, we could have just done one of the marble slabs, but I was REALLY feeling a polished travertine slab which I thought would really tie the whole "travertine" house together.
 Since the auction doesnt tell you what the starting price for pieces are until the actual item is up for bid, we did some research that night on stuff we liked and set a ceiling for what we would pay and still get a "good deal".

Like two love-sick One Direction-loving tweens, we were still swooning over the travertine honeycomb mosaic and found it online for nearly $11.99 a sq ft.
Found here
The next day I was more nervous than Lindsay Lohan making a court appearance so we got there about 20 minutes early to re-scout our stuff... I, of course, was my usual bubbly friendly self.
"So much as look at this granite and I will cut you..."
 Was I a bit over protective? Maybe... did it work? HELL YEA IT DID!!!  We won it!!  $175 a slab! We got five! (I know that sounds like a lot but we wanted to get extra just in case of any breaks during transporting it to our place and cuts and stuff)...

And, for some fun math for all you numbers people out there, here's how we determined what we paid per sq ft... size of a slab 26x84 = 2,184... divided by a sq ft (12x12 = 144) ... equal 15.166 sq ft per slab.  We paid $175 so divide that by 15.166 and we only paid $11.54 a sq ft!!!!  The edging and the corners are already fabricated so we only really will need to have it cut for the sinks and the corners!!

Here is a bit of a better picture of the granite...
We also scored the honeycomb mosaic back splash for, (are you ready for this?), $3.00 a square foot!!!!!  Shut up, I know...

I also got my polished travertine counter for $175 for just one slab!

Since we were in the buying mood, we also snatched up these awesome 16x16 travertine tiles which we plan to cut in half length wise and use them to encase the shower in the master bath with a subway pattern...
Sorry the picture is so yellow... warehouse lighting is tough... its actually a very creamy neutral
At the end of the auction, we decided to load up what we could in the back of my SUV and have the warehouse store our counter tops until actual D-day when we start the kitchen (only $20 a month to know they are safe and in one piece is money well spent for us).   So we picked the slabs we wanted and marked them with our buying number.
 There were 10 slabs total (we bought 5) so I may have gone a little overboard when labeling the ones we wanted...
Oh and did I mention each slab comes with a 4" granite backsplash? Cause it does... 

Ah! yea, wow, I almost forgot to mention... we also scored a broken piece of the same Almond Mauve for $50!!
 I measured it out and if we cut off the broken parts, it still has 4ft of usable granite... we have corner cuts for our kitchen that are only about 34" long so this would be perfect... Doing a little math, our 4ft slab was only $5.77 a sq ft!!!  This also leaves us room to resell what we dont use on Craigslist and hopefully make some money back!

After hugging and kissing our counters goodbye for now (Im not joking, I really did...) we loaded up our backsplash and travertine tiles and headed home...
 And added to (what Chris affectionately calls) Mt. Travertine in our garage...
A couple hundred sq ft of 3x6 travertine pavers, 60 sq ft of travertine honeycomb mosaic, and 90 sq ft of 16x16 travertine tiles.

We know we have MORE than enough, but I rather be over prepared and sell the extras on Craigslist than accidentally run out!

All in all, we spent a little over $1,800 but saved more than $4,000 from buying it else wear or at big box stores!!! HUGE!!

We really dont plan on starting the kitchen and bathrooms until late Jan/Feb but since this was the last Dallas auction, Im glad we got it all now (plus, it makes bills so much easier to pay when they come in waves instead of all at once)!

Do you guys like what we got?  For all those interested to see if Marble and Granite auctions are happening in your state/town, here is the website for the company we bought from (we loved them and their prices are MORE than fair!)... http://stoneliquidatorsgroup.com/... just call their 1-800 number and they would be happy to check for you. (P.S- Im not being paid or given a discount for dropping their name... we just really liked them :-)


Like us on Facebook

Little House in the Big D

Flickr Images