Wine Bottle Torches

12:51 PM

Well now that we have a deck, pergola, and lighting, the only thing that we really NEEDED to enjoy our wine beer mixed drinks dinner good-times out on the deck, was a way to get rid of all the pesky little night-time critters... and by critters, I mean mosquitoes...

Little known fact between me and these winged creatures of the night, we have had an on going battle for the past 26 years... Its a love/hate relationship. And by that I mean they LOVE me and I HATE them.  Seriously, Im outside for 5 minutes and I come back in looking like I have the chicken pox... I LOATHE mosquitoes... yes, LOATHE.
So when thinking of solutions to this problem, Chris kindly suggested tiki torches... and I kindly replied "over my dead body".

This beautiful deck/outdoor area will NOT be cheapened by tiki torches... no, just no.

Enter the Google, where I stumbled upon THIS website explaining how to make "Wine Bottle Tiki Torches".... GENIUS!!!
Full details of how to make these can be found on there website: HERE
Since this is their idea, and not mine, this post isnt going to be a "how to" but rather a "we'll try it and let you know how it goes"

First step first, we needed wine bottles, at least 6 of them.... (our friends our always willing to contribute to a good cause so each graciously helped provide at least one drank empty bottle)
 I let them soak in some hot water and soap to get the labels off (tip: scrubbing them with steel wool after helped get off all the little bits of glue)
 We then pre-ordered all our needed tools per the "how to" website via Lowe's and picked them up a few hours later (P.S- if you shop at Lowe's, you NEED to be using this service... it saved us TONS of time and we didnt have to scour the store asking "What isle can XX be found?" or "I'm probably starring right at it, but can you help me find XX?" We love it!)
 All in all total was a little over $3.75 for all the supplies per bottle... not too shabby! **side note: the only thing I would recommend is buying a 3/4" spliter instead of a 1" (it was too big)**

I was a little worried about the wicks and would DEFINITELY recommend getting the wick/bottle seal as tight as possible.


First time we tried this, ours was a little loose and they would only stay lit for about 3-5 minutes before going out... lesson learned: make the seal SUPER tight to suck up all the oil!
 We didnt flood the bottle with a ton of Tiki: BiteFighter (its the super-duper anti-mosquito oil because I am NOT taking any chances) but just left the tip about 1-2inches deep.
 Once everything was happy and built, we had to determine where we wanted them on our deck...
 We decided a little above eye level so 1. People could see them and 2. It was the height we determined was least likely to catch anyone on fire.... which is a bonus.
 
 Last drill just to make sure it was secure.
 Ok, so super pretty!!


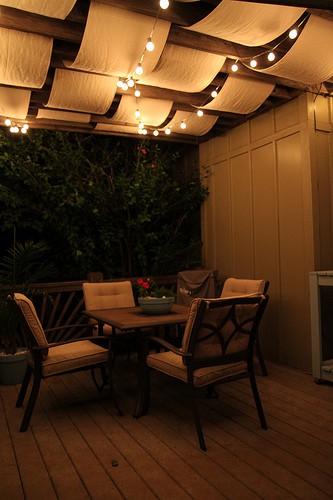
I seriously couldnt wait until it was dark to light them! (P.S- they stuck out about 5 inches from the beam.  We were worried at first that this would look kind goofy, but they ended up being perfect and we didnt have to worry about them accidentally catching the wood on fire or leaving any scorch marks)
 Here's a pretty blue one...
 We decided that 5 bottles was the magic number and tried to put everyone parallel to the railing (except one beam that didnt have railing) to make sure they would stay (for the most part) out of everyone's way...
 A full deck view:
 And at night time??
 OMG i love them...
 The flame above looks pretty big/out-of-control but I promise they were pretty mellow (I tipped this one on its side to get a little more of the oil up in there for the best picture... only it turned out a little pyro-ie... ... ... hooray FIRE!!!)

I dont know if you noticed in our previous "lighting" post, but we had them out and lit for the little get together we had last week.
They worked perfect and I'm happy to report I didnt get bitten ONCE by any evil 'sequitos!! (probably because I was wearing jeans, boots, and a long sleeve shirt, but we'll go ahead and award it to the wine tiki torches)

So there you have it!!
Do you guys like em? Would you ever try something like this? Again, if you like em, check out that website and try em out!!


I would love your feedback!
-Samm


Setting the mood... with patio lights!

9:21 AM

So our pergola is up! YIPPIE!!!

We still have about a million little things to still do to it before we can raise our hands in the air and yell "DONE!" but one of the main things we wanted to tackle first was our lack of night time lighting.

Via Pinterest (and our wedding rehearsal dinner) we had fallen in love with clear globe lights that gave off the perfect nighttime mood...

via
via
We knew we would need about 75ft-80ft of lights to string through our pergola and had searched some websites that could provide "restaurant lights" (a bit more of a professional grade/look) but at $250, it wasnt necessarily "in our budget" (read: no way in hell)

Lucky for us, I was browsing the Target ad while watching Mad Men one night (spoiler alert: Don killed a chick!!!... ... ... or did he?) and noticed that their string lights where on super sale!... $9.... yes, $9...
Here's the link in case you wanna see
Since they were 25ft, we would only need three of them, it brought our patio light total to $27... (Basic DIY Homeowner's Math $27 > $250 )

PLUS, at $27 it was worth a "why-not-i-guess-we'll-try-it" investment...

After picking up three packs at the Target down the street, we brought them home and wasted no time putting them up.

However, before we started, we read some reviews online which stated that the bulbs were pretty fragile and a couple people had problems with theirs breaking while trying to put them up...

Solution? Take out the bulbs before putting the strings up:
I put them back in their little plastic boxes, then on the ground so they couldnt accidentally fall off the railing...
Chris and I chose an every-other-beam zigzag pattern and broke out my trusty staple gun to secure the wires...
See?! No bulbs...much easier and FASTER to put them up without worrying about bulbs breaking.

While Chris staple-gunned away, I was hot on his tail screwing the lights back in...
Rocky and Gus played, barked, chased each other, ran in circles, dug up what is left of our poor lawn, nipped at heals, got rowdy, supervised....
We were SO tempted to plug the lights in right away, but we knew if we waited until it actually got dark outside, it would be even more worth it... Time lapse past dinner and an hour long trip to Home Depot:
Oh.my.goodness, its perfect...

We're kinda in love with it... they look AWESOME! Not cheapy at all, like we were worried about!
And the next night, the lights were PERFECT for a little birthday get together we had for two of our friends...
 (I love how I captured Blake throwing back his head in a fit of laughter... ha-ha-ha-ha!... and yes, that would be a beer pong table to the left... We've been out of college for less than 5 years so we still think its legit)

We also bought down a little patio table from Pottery Barn my mom, aunt, and grandma got us as a wedding shower gift... we now use it for nice dinners on the deck drinking games.
 I took these pictures pretty early in the night, but all in all we had about 20 people in, out, around, and on our deck and it never once felt cramped.
I can see this becoming a weekly thing... have I mentioned how much we LOVE this deck???

Have you guys done outdoor lighting? String lights or something different? We love the look when their hanging from trees, but didnt want to do too much... I would love your opinion!
-Samm

The Deck... pt 3... building part DONE!

8:13 AM

We're done! We're done!
We're almost done! We're almost done!

To say "done" on ANY project is a bit of an over statement, so lets just say we've mostly "completed" our back deck....

Last we left off, we were here:

To catch up on previous weeks, click HERE for week 1 and HERE for week 2
During the time in between weekends, Chris installed some lattice on the west-facing part of the deck to add a little more privacy and shade for when we have those hot summer sun sets here in Texas.

While attempting to get a closer shot... Rocky got in the way...
Which then lead to me think "Where's Gus?"...and then I had a mini major panic attack.

You can see, the gate was open and I was missing one small white and fluffy pup. After about 5 minutes of convincing myself I was the worlds worst mom pet-owner... I found him...
Yes, he was under there the whole time... While I yelled and yelled and almost got in my car to search for him... he was here.
If he wasnt so cute, I could've killed him...Facing boards and additional lattice around the deck go up this week...

May the project continue!....
Since the building the pergola was priority #1 (more pergola = more shade to work on other projects) Chris, his dad, and his uncles started right up...
So more planks were added...
And building was underway...

Chris's dad and Chris's uncle helped finish off the stairs...
While Chris made sure to nail in the brackets to support the planks..
Arent they pretty?
Looking good!

Even got the last major support beam installed!

And then it was time to talk about furring strips.

Remember back last week when I chose this style:
Over this one...
...Because I wanted it to be more "open"?

Yea, I was wrong.
(quick Chris, mark down the date because you will probably never hear me utter that phrase again... I joke, I joke... .... ... ... but really. Mark it down)

I dont know if I was thinking it was going to be larger slats or what, but after seeing how they looked a foot apart, I hated it.  And it provided NO shade (whole reason we are putting up this sucka in the first place).

So closer and closer they got... and even debated putting lattice on top instead of furring strips
Which I quickly "exnehed"...

And we decided to go with a 4" gap...
Which looks awesome...
And provides shade!
Ha-zah!

 Honestly, how good is this starting to look?!


And here's where we ended the day:
The next morning, I came out see Chris swinging from the rafters...
Thank GOD he was just sitting on them, but still... no wife wants to see that.
Blake was nice enough to came back over to help finish up.
(We have since determined that as long as we own this house, Blake has the right to sit wherever he wants on the deck.  If he wants a chair that someone is already sitting in, Blake gets to call "Deck rules" since he helped build about 50% of it, which technically makes it HALF his... I am eager to see this "rule" actually take place.... After we get furniture... ... .... and as long as its not MY chair...)
So up the furring strips went!!

But Gus was kind enough to point out what was still missing...
Yes, facing boards to keep the pups OUT from under the deck...

Here is the left side...(still missing one final board)
And the right side...
SOOO much better...
Doesnt that look purdy?!!!

Chris's Dad was even nice enough to put facing boards on the side of the stairs as well!

Chris and Blake also whipped up some railing for the stairs...
(sorry about the candid picture hunny...)

and after that, plus some clean up, here is what we had starring us back in the face...
Totally loving the two step pergola!

And actually, THIS is the first picture I took... but Rocky is kinda ruining it/making it awesome...
Seriously, I couldnt have TRAINED him to be anymore inappropriate during our "after" picture if I tried... good potty, Rocky... good potty...

And just because I teased you last week, here is a picture of the garage sale rocking chairs I made over in their new home...
And my favorite part... the quick little scroll through of our process... three weeks in the making...
 We still have a LOT to do:

- wait for the wood to dry out so we can paint/stain it... (still deciding on colors but we have some time since it typically takes 4-6 weeks for wood to fully dry out and accept a stain)

- Get some furniture (even though it does look really good just standing on it.. people WOULD probably like a place to sit)

- Put up some patio string lights (UPDATE: Read about how we saved $223 on great looking lights HERE)

- Put up something for mosquito prevention (there will be NO Tiki Torches on my lawn... nope never, ever, ever)

- Build a planter bed on the left side of the deck and plant some pretty, evergreen vines to hid the lattice

- Reseed the lawn (having all the material sitting out there for 3 weeks did a NUMBER on our lawn  now dead area

- Extend our stone walk way down the right side of the deck where the flower bed and herb garden meet (like we did HERE for our side garden)

Im sure there are a million other things we still have to do that Im currently forgetting, but oh well... the main thing is that the deck is now USABLE!!

Here is the awesome side by side before and after for ya:
 And just to give you some scale, heres a picture of Me and Chris (and Rocky... I dont know where Gus is... hopefully not under the deck since he would be stuck there now)
Sorry its so blurry... its a cell phone pic... icky.

Well what do you guys think? Like it? Eager to see it painted/stained?  Is it what you thought it was going to look like after all that work?  I would L-O-V-E your feedback!

Thanks!
Samm


Like us on Facebook

Little House in the Big D

Flickr Images