The deck... it begins...

3:48 PM

(duh...du...DUUUUHHH!!!)

Yes, it's here... the ENTIRE reason we are redoing our backyard... expanding our deck.

(First, a warning: this is a long post with about 1,257,856 pictures... totally all worth it though since we are only doing this ONCE! As a reward for making it to the end of this post, there's an awesome Before/After picture for you :-)

Ok, so to the 10 little pieces of wood our deck now... its not that much compared to all the room we have in our backyard...


As you can tell from earlier/realtor pictures, its pretty small... 12x10 to be exact.
That picture makes it look bigger than it really is... seriously, whoever took the realtor pictures of our house before we bought it did an AWESOME job of making our little 1,456sq footer look like the Wrigley Mansion (...Scottsdale, AZ reference...)

Here's a another before picture that I took... mostly because I think our backyard looks better with my husband in it...
So here was the plan:
To give you a bit better idea, Chris was standing left of the AC unit in this drawing... so basically flipped.

Since this is a picture heavy post, Im going to let most of the pictures speak for themselves... unless I have something to say... and then I'll butt in...

And so... we begin.. break it down now...


Who just doesn't love exposed rusty nails??!

We had to replace the first couple boards on our current deck since they were cut out for the hand railing (which is going to be disappearing)...


"He's sexy and he knows it...".... ... ....
"Wiggle, Wiggle, Wiggle, Wiggle".... (anyone getting my reference? no, just me? ok then...)

It wouldn't be a "Yanniello Project" without some sort of electronic torture device power tool...


Next stop was Lowes... were an AWESOME lady by the name of Deborah gave us a "contractor discount" since we bought so much wood and supplies... it was definitely still over $1,100 AFTER the discount... my wallet hurts thinking about it....

Anyone else find it ironic that we had a Home Depot truck to hull our Lowe's supplies?  Can't beat that by-the-hour rate! Especially since we had to go back twice since all the lumber weighed too much :-)
We had to lay all the wood on an even elevated service to prevent the moisture from the grass warping the wood...
... and used blocks to keep it from warping up...
Here's a nice picture of Gus's contribution...
5 seconds after this picture, he peed on the wood... ... ... I guess the deck is "his" now...

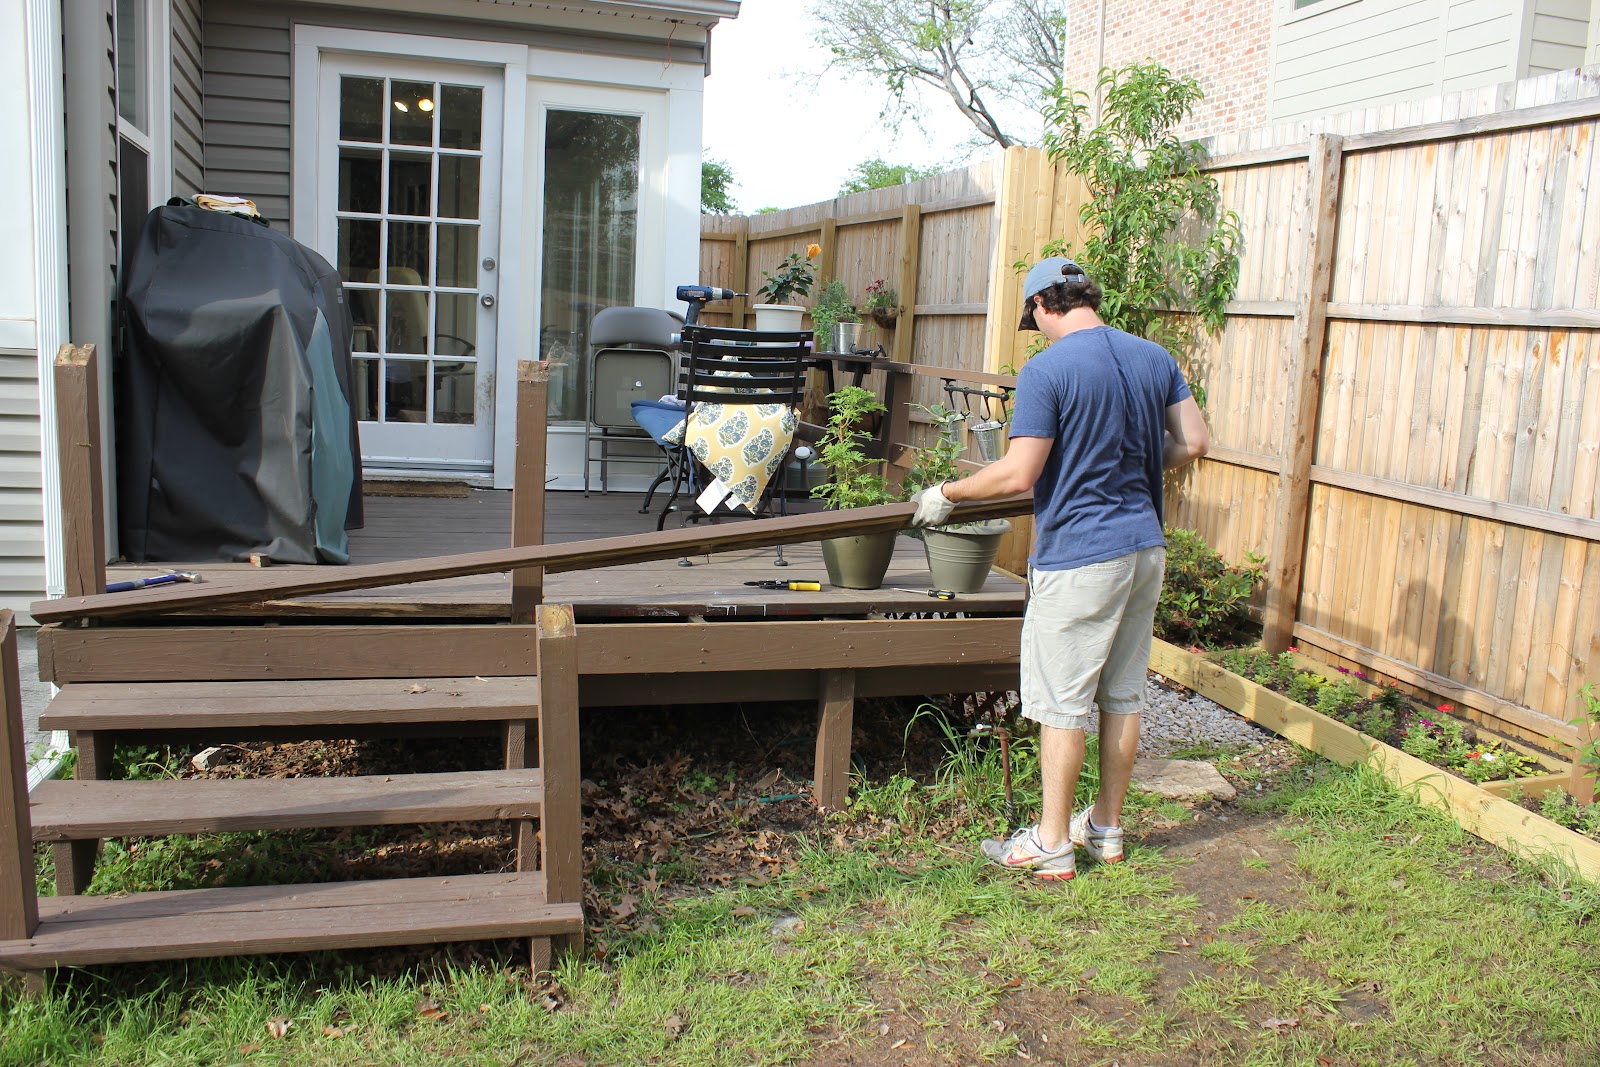
But back to the deck-deck... stairs are gone!
And a new post was put up so we could use it for railing...


Handsome...


In case you were wondering about Rocky... yes, he still has separation anxiety... but luckily kept a very close eye on the project...
Posts are up!

and even...

Ok, this might be my favorite part of step 1... the auger...
For about $100, we rented one for 24 hours and is pretty much a tool sent from the Digging Gods...
Saves a TON of time that you dont have to waste digging, its fast, cheap, and fun to handle...


I highly recommend renting one for any hole digging in the future...


To give you an idea of how deep we had to dig, here is a lovely picture of my husband trying to touch the bottom.
Why so deep you may ask? We are building a pergola on top of our deck which means the posts at least had to be 16ft tall... and to support all that weight up top, you really need to make sure that everything is good and secure down below...

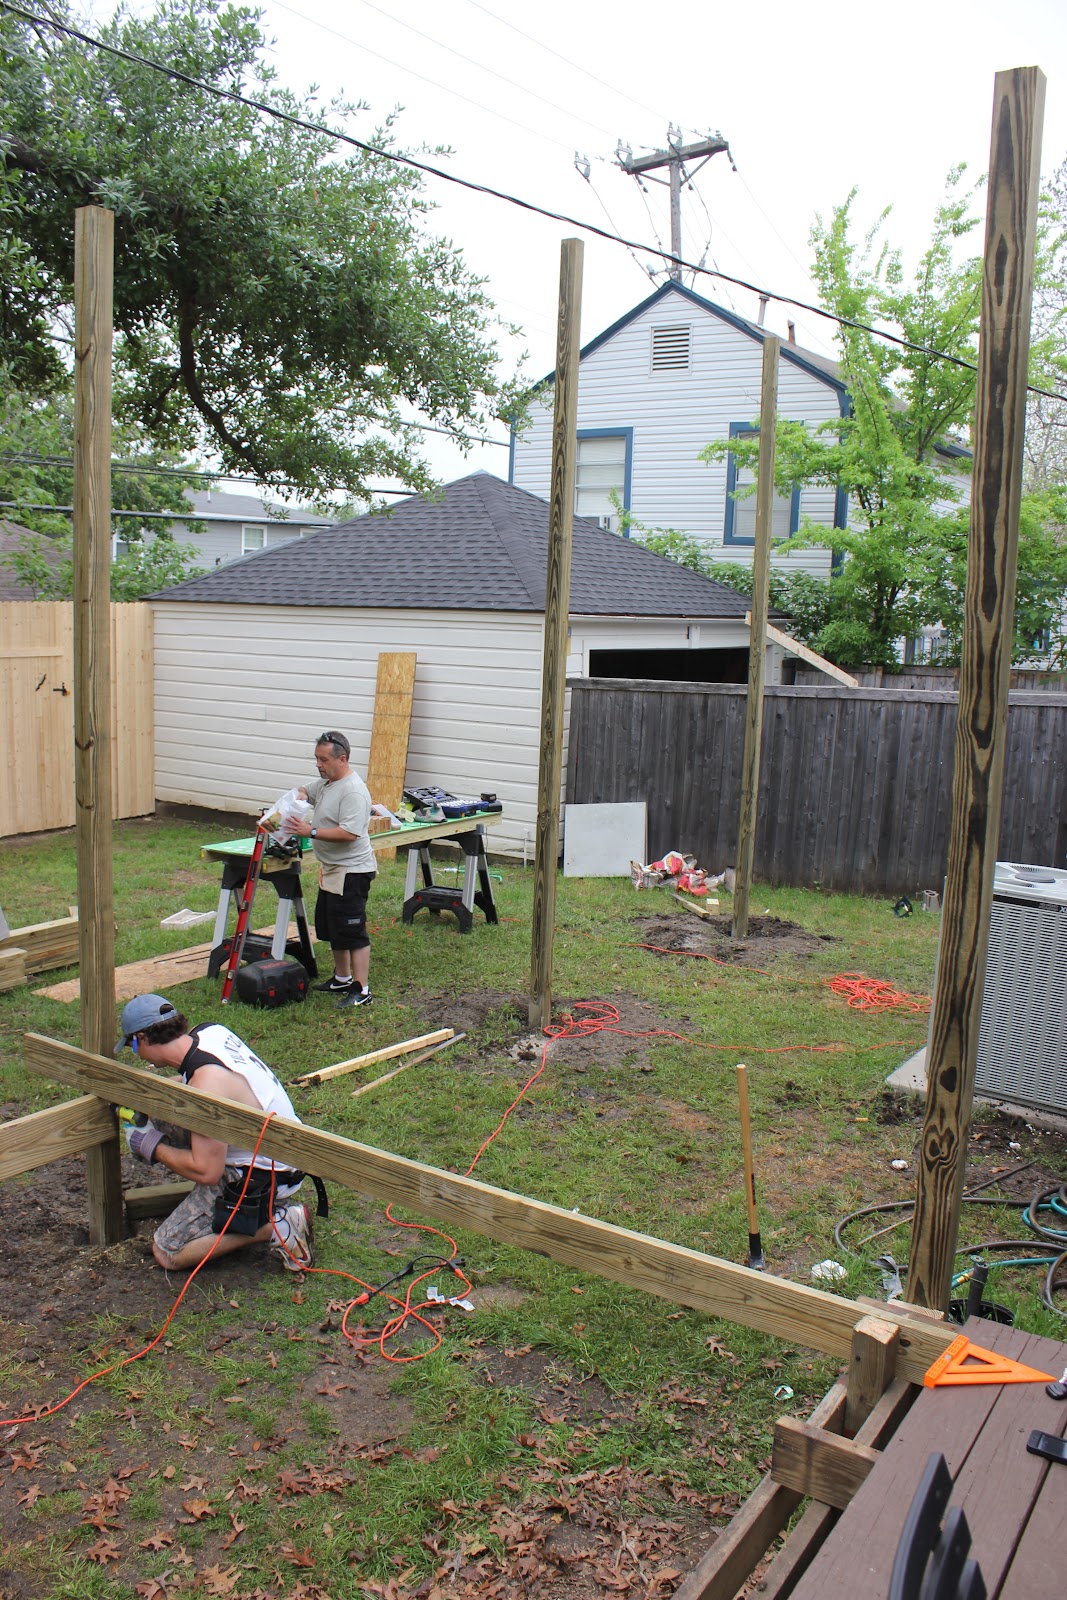
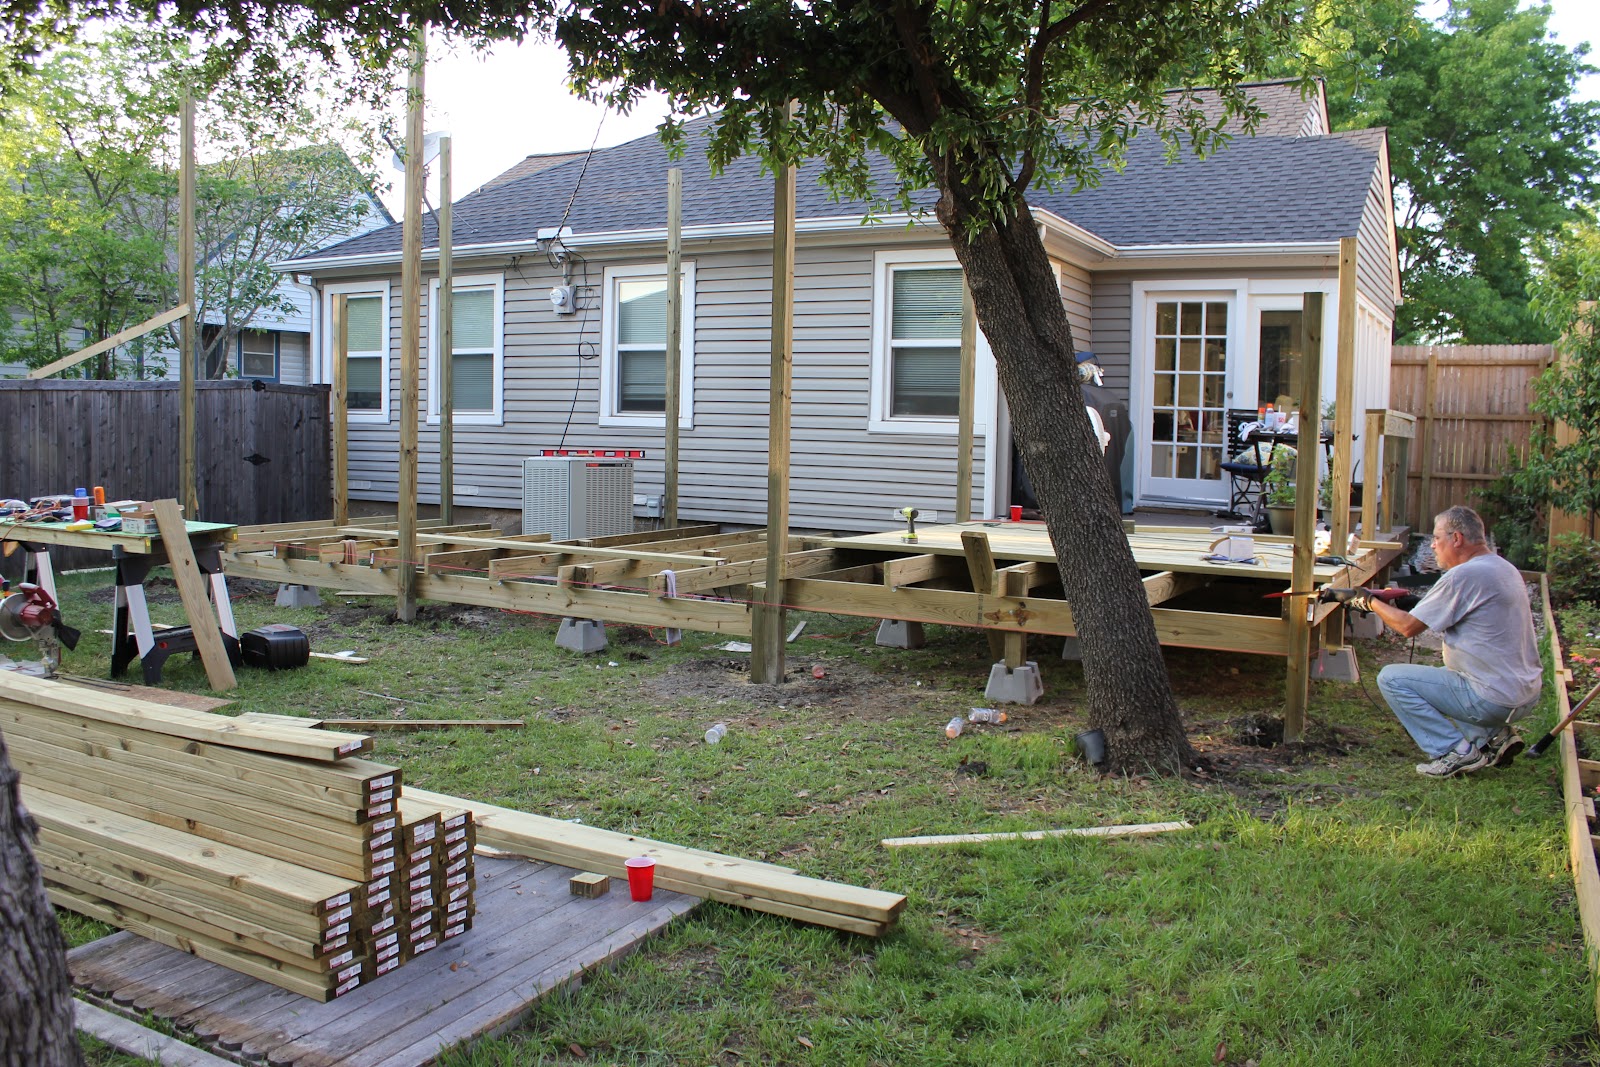
So today's lesson? The auger... get one...
Next step was setting everything in quick set concrete and making sure it was level...


Here's a better idea of how high the posts are.
Our pergola isn't neccesarrily going to be that tall, but better be safe and tall, then do it all over again if the post were too short.


Here's where we left after day one...
Next day was all about the framing...


And cutting some of the post down for railing...
Not only was Chris's dad and uncles helping, but our good buddy Blake came over to help as well...
Ladies, he's really good looking, handy, funny, AND single... (message me if you want his number ;-)
Railing height!


and some breaks...
AHHH we have flooring!!!
and more flooring!
except for over here...

progress...


I even got to help screw down some boards!!!
I can say with 100% certainty that board is the best one of the entire deck...

Also debating if this should be our Christmas card next year...
"Love, Hugs, and screwing... from the Yanniello's"


omg, the flooring is done!

and yes, we needed a fan outside... its already THAT hot in Texas...


The Day 3 was all about railing...
And more Blake!!!

Not was I supervising, I also got great tickets to the gun show...
Coming along!!
We are still going to put a top shelf on the railing for drinks and what not, but I think its looking pretty darn good!
Ok, this last picture was taken at 11:05pm on Sunday...
Boys will be boys... can't get between them and a project!

So, thats weekend #1!! We have about 2-3 more it properly finish it up, but more post should be following shortly (especially since we started this a couple weeks ago :-)

And as promised, here is the before after picture for just this week...
(actually, the "after" picture I took at the beginning of the following week... consider it a teaser)

I would love to hear what you think of the progress so far!!!

You Might Also Like

15 comments

  1. That looks fantastic! I love all the pictures. :) We (aka my husband and friend) are expanding our very small deck tomorrow. Your post was perfect timing for inspiration. :) Enjoy!!

    ReplyDelete
    Replies
    1. perfect!!! Good luck! Post pictures! Its definitely an exhausting process but totally worth it!

      Delete
  2. The amount of progress in the short time frame is amazing :-) and I laughed out loud and startled my baby when I read your Christmas Card idea!

    ReplyDelete
  3. hmm wondering if Blake would like a short trip to Australia to help build us a deck?
    It looks awesome Samm, I love reading your posts

    ReplyDelete
  4. That is a big project to take on! Wow, looking good. I'm pretty sure that Christmas card might make a few family members blush. LOL

    ReplyDelete
  5. That is going to look great after you're done!!!

    ReplyDelete
  6. Wow wow wow! What an ambitious project! It looks fantastic. Will the steps come off the center of the addition? Great job ~ nice job with the pictures too!!

    ReplyDelete
  7. This comment has been removed by the author.

    ReplyDelete
  8. It looks like so much work!!!
    It will be worth it!!!
    ALl I have is gravel where a deck should be, lol!

    ReplyDelete
  9. Really... Blake is the single friend you are looking to set up? #ICameBackFromIraqForThis

    ReplyDelete
    Replies
    1. HAHAHA Oh, Jared... your post is coming... I promise your handy work on the deck will not go unappreciated!

      Delete
  10. Wow you guys made a lot of progress! I can't wait to see it all finished. I just found your blog and I'm loving it, I'm your newest follower :-)

    ReplyDelete
  11. I think it is looking fabulous! Can't wait for the final after photo! :)

    ReplyDelete
  12. You're so fortunate to have such a capable crew. Looking great! You'll get lotsa use out of that beautiful deck!

    ReplyDelete

Comments make my heart happy... and I read every ONE of them... thank you so much for taking time to make my day!

Like us on Facebook

Little House in the Big D

Flickr Images