DIY Sensory Board

12:19 PM

So with Brooks crawling around and wanting to get into everything (read: EVE-RY-THING) he is getting more and more curious about how things work.  From opening and closing his closet door, to banging two plastic cups together, he's finally getting "it".

That's why I thought making him a sensory board would be fun since it would be all his favorite things in one place.

I looked up a couple different options on Pinterest:
link
link
Basically, I just determined it was a bunch of random knick-knacks glues to a board.  Nothing too hard.

Chris and I headed off to Home Depot (aka. Brooks' second home) and picked up a bunch of random movable, tactile, and safe objects to put on our board.
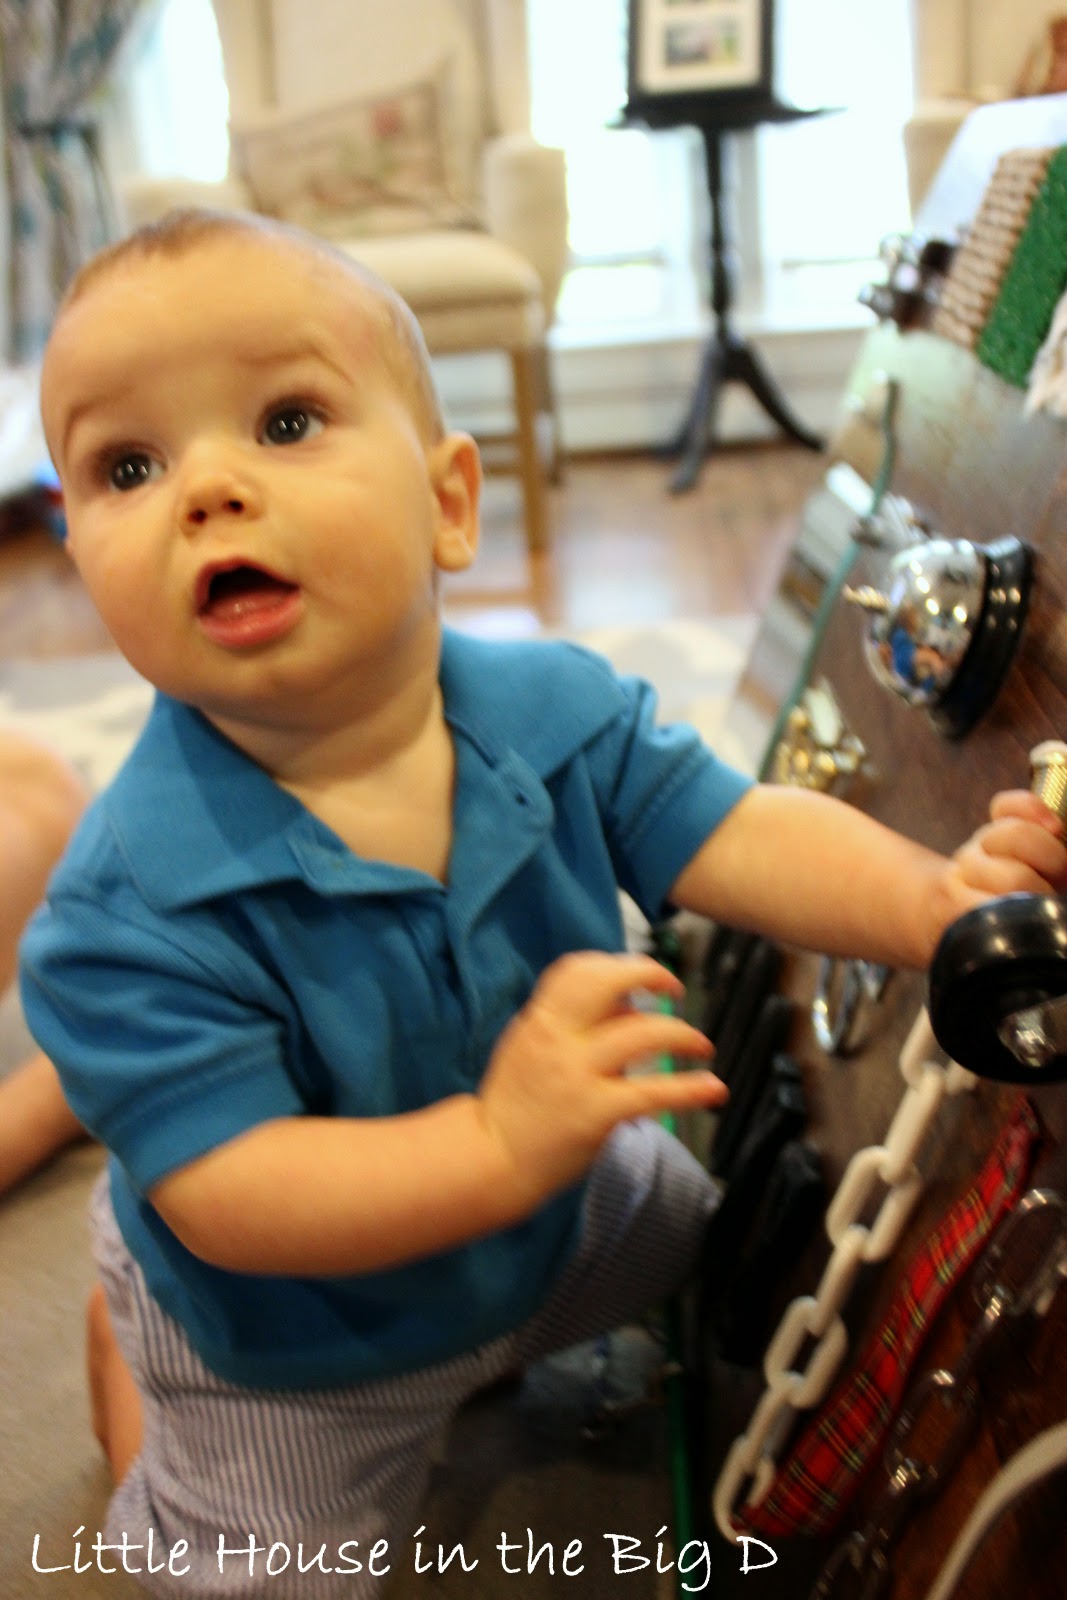
What made our cut?  (starting at the top left) A latch lock, carpet square sample, astroturf sample, faux-fur (from Michaels), sandpaper, (second row) mirror (Michaels), hook latch, hinged lock, doorstop, bell (Office Depot), furniture wheel, (third row) chain lock, hitching ring, plastic chain, ribbon (via our junk drawer?), metal chain, velcro tie (another weird thing we found in our junk drawer), (bottom row) there will be a bungee cord with different attachments.

As for the board, we couldnt find anything already pre-made to the size and shape we wanted (we debated getting some builder's grade ply-board but didnt like the cheapy feel of it) and end up finding this at Lowe's.
The corners were a bit sharp (read: eye gouging) so Chris cut them and then made them nice and rounded by using a low grit sandpaper.  We liked the idea of staining it and then sealing it in with polyurethane for a smooth finish, so Chris got to it.
 
 Ohhh pretty...
Next, we just laid our pieces down on the board in the way I prearranged them earlier, just to make sure they still made sense.
Oh and those letters for B's name?  Also a Michaels find that we stained ebony.  Its another fun texture for him and a good way to start recognizing letters and how to spell his name.

After that, it was as easy as using Liquid Nails to glue everything down or screw the big ones into place.

Fun side note: Did you know that can use extra pieces of unused carpet square samples as a drink coasters for your margarita while you do this project?  Because you totally can.
Chris even spoiled me with a drunk pineapple in my drink... yea, things get pretty crazy over here after bedtime
Once we got everything down, we let it dry over night to make sure everything sealed and little man wouldn't be able to rip anything off.
(I didnt take a picture of the back, but it helps if you also have a dremel to cut off all the screws and such that stick out on the back side of the board... better safe than sorry, just in case :-)

In the morning, we showed it to Brooks, really not knowing what to expect... would he get it? Would he be entertained for 15 seconds then go and find a half eaten dog toy to play with?  After all our hard work, we sat him down in front of the board and awaited his reaction.
He loved it.
 
 
 The door stop is a big seller...
He seriously went to town on it and played and played and played.  We sat next to him and pointed out some of the locks and he was able to copy us opening them and loved to do it himself.

Happy Little Boy!
Its heavy enough to lean against the coffee table and Brooks use it to pull himself up, but WARNING, he can (and will) pull it down if he wants to, so Chris and I only have this out when we can be right there with him holding the board against the table.  Sometimes we just put it on the floor and he crawls all over it, which is a bit of a safer option, but Brooks likes to stand.

Its also not too heavy so its easy to tuck away behind a couch or in a corner when he's not using it.

All in all, he loves it, and so do we.  Honestly, we made this about 3 weeks ago and it is still is favorite go-to thing to play with!

In the end, it probably cost us around $75 with all the gadgets, knick-knacks, and stainable solid board.  I know that's REALLY pricey for a kids toy, but something about the satisfaction of making something for your kid yourself that is contributing to his development and fine motor skills made it an OK purchase for us.  (Plus I'm sure it would have been a lot cheaper if we just would have gone with more stuff in our junk drawer).

So there you have it! What do you think!  I think the Montessori movement is pretty cool and I much rather have our little guy sit in front of his thing instead of a TV screen.  Has anyone tried anything similar?  Or maybe you would have added something different to your board!  I would love your feedback!  Thanks!

-Samm

10 months... and 15 days late

4:19 PM

Oops... I almost forgot about B's photo moment for his double-digit birthday month!

This kid is seriously becoming the best little human being to ever walk the planet (not that I'm bias).  He is so fun and his huge belly laughs get me every time.  You can tell he is beginning to understand more and takes instruction like a champ (except when he looks right at you when you tell him not to put a sharpie marker in his mouth and he chooses to ignore you).

I dont know how its possible, but I love him more and more every month.  I can't believe his year b-day is around the corner.  Heaven forbid he starts to walk soon.  No, just no.  My heart can't take it.

Anyway, here's 10 months of my squiggly bottom little man!


DIY Safe to Eat, Homemade Play-Doh Recipe

12:17 PM

Since Brooks is now getting into everything (read: EVE-RY-THING), I figured it was about time to introduce him to some mommy-approved messy stuff. (Apparently my thinking is the house is TOO clean)

Play-doh itself is one of the greatest inventions known to mankind, but since B is in his "everything-MUST-go-in-my-mouth" stage, I figured I would see if I could make our own with ingredients I wouldn't freak out about if ingested (I draw the line as random pieces of dog kibble and dust bunnies).

After trolling the internet a little, I mixed and matched some recipes I found and created the below which worked great for us.
When you first put everything in, it looks a bit like porridge and pretty liquidy.
 After 2-3 min on a low heat (I think I had ours around a level 3), it started to clump up and become a lot thicker as I spooned it around the pot.  I was worried about it burning, so I just kept a slow stir going the entire time.

You will notice its "done" when its thick enough to form in a ball and all the ingredients clump together.
 It still will be pretty warm (too hot for little hands) so let cool at least 15 minutes.
 Before dishing it out to a kiddo, kneed it up a bit to make sure there are no random hot spots.

Then, set in front of your freakishly adorable 10 month old and enjoy!
Brooks like to hit it with his palm and I rolled some pieces up to create different sizes for him to play with.
When you roll them, its doesn't HAVE to look like poop, that's just the shape mine took... sorry about that. I guess we now know why they don't make play-doh in brown.
 Brooks loved moving the round, ball shaped ones.  It was fun to see him figure out the difference between moving the long ones with his hands and then only needing his finger to move the larger balls.  Very Montessori learning.

He even invited me to get in on the action.
Such a good little sharer.

After playtime was over, I balled everything up and put it in a glass pyrex in the fridge and we were able to use it for 2 more days before I tossed it out.

At one point, Brooks did try to eat it but the overwhelming salt taste made him stop pretty darn quickly.  It did make his hands a bit salty, but definitely no dirtier than playing with playdoh.  Super easy clean up just using a wet rag.

I think next time I make it, I'm going to throw some food coloring in there just for fun.  Fingers crossed it won't stain B's hands, but I will let you know.

Has anyone else ever made homemade play-doh?  Any other fun at-home recipes you know about?

-Samm

Summer time landscaping...

1:26 PM

This past Sunday, Brooks got up around 7am but after I changed him, he fell right back to sleep and stayed that way for a couple more hours (Bravo little boy!).  However, this now meant that I was UP... and a little bit board just laying in bed.

I tried to convince Chris to wake up and entertain/play with me, but for some reason he wasn't having it...

 Lazy...

So I did what any normal DIY wife would go... put on a pair of yoga pants and headed out to Home Depot.

It was there that I received the inspiration that we should mulch the front area on the other side of the sidewalk.

So I just grabbed just a couple bags and headed on home to surprise my sleeping husband.
 Doesn't he look excited?!... ... ... ... ...
I thought we would give the red mulch a go since we have a red front door, red chimney, and I'm always looking for pops of fun color.

Before he got started, here's a quick little view of how it looked before the mulch.
 See that area in between the trees?  Don't let the green fool you... its weeds and dirt... and not pretty.

While Brooks napped, I helped mulch up the walk way too then headed inside when Little Boy Blue woke up.
 After awhile, (and possibly a minor heat stroke),  Chris came in, showered up, and we switched hanging out with B... I think he got the easier job.
What makes every woman happy.  I good-looking, shirtless man, holding a piece of chicken and a sleeping baby.  (sigh)
 When I walked out our front door... it looked beautiful.
 Here's the new view from the street.
 And a side shot... like you would see if you were driving up.  I like how Chris even did the weed covered strip down the driveway.
 I know red wouldn't have been everyone's choice, but I was worried the dark brown would have just looked like dirt and not as clean.  Plus, red is my favorite color and its my house... so... yea...
 And the driveway...
 Planter beds too?  We so fancy...
 There you have it! What do you think?
 Bit of a difference from 2011 when we first bought it

Have you guys ever mulched over a large area to get rid of weeds?  Do you like the red? (lie to me if you don't) Have you ever got someone into a project because they were sleeping?  Due to the sunburn on Chris's back, I believe he has learned his lesson :-)

Hope everyone had a great 4th!

Like us on Facebook

Little House in the Big D

Flickr Images