Spring Time Storage

10:34 PM

So this weekend while browsing my usual "route" for garage sales, I came upon this little beauty for $15 at a charity garage sale. (It was benefiting an animal rescue charity, so I didnt haggle since its was going to such a great cause!!)


 I knew I wanted to give some it some new life and paint it something "happy" since it looked a little down on its luck (hopefully one of the rescue dogs didnt pee on it or something...)

First step was removing the face plate so I can get a good even coat...
 The tongues where bent on the inside so half way through I had to recruit my resident lefty (aka Chris) to help me with the ones I couldnt get...
After he was all naked and stripped down, this is what he looked like right as I started priming...
Since its already full-swing Spring here in Dallas, I decided on a Spring time yellow, appropriately named "Warm Yellow"

Apparently the person who comes up with all the creative names was on vacation when this color was up to be named...

After a solid coat of primer and several light, even coats of "warm yellow", this is how he, now she, looked...
I also primed and spray painted the face plates white since I thought it would be a softer contrast against the yellow.
While I continued to work, I kept the dogs inside so they wouldnt get into any of the spray paint... but as you have probably figured out, Rocky has separation anxiety issues...
He even fell asleep while making sure I was doing a good job...
What a watch dog...

I gave it a day to dry, and for me to think what else I wanted to do with it...

I had already done stripes on my table redo that I did a while back....
And the stenciling thing with the $10 solid wood desk I revamped...
So I was running low on ideas... until I went to bed and it hit me... Mod Podge.

I havent worked with Mod Podge since my sophomore year of college, but from what I remember (making my Theta lap board for my Little) it was a great way to secure images onto a flat surface....

The only thing I needed now, was an image or design... Enter Michaels....
I found some cute scrapbooking paper and narrowed it down to three that I really liked...
I cut them into strips to see which looked best on the actual piece...
I ending up thinking that black and white one was a little too "bumble bee" for me, so it was down to the flowers and the subtle see through damask one...
Again, since its Spring time, I was feeling bold and decided to go with the flowers...

The process was easy enough... first, cut the paper to the size of the drawer...

Second, I hot glue gunned around the edges for good measure....
(Using the hot glue was actually really nice since I just wanted to make sure the corners and paper were pulled smooth...)
And then... toot the horns... bring on the Mod Podge...
Once everything dried, I re-installed the face plates and was astounded with the results...
Ummm I kind of love it...

Just such a transformation! It definitely stands out and is a fun, new, unique piece...
 Here is the awesome before/after for ya...

For a under $20, I have some great new storage for all my craft stuff...

What did you guys do this weekend? Do you like the scrapbook paper I chose or would you have picked something different??  I would LOVE for you to leave a comment!!!

A Picture is Worth a 1,000 Loads of Laundry

9:25 AM

As you could probably guess by the title of this post, we're about to go through the makeover we just did on one of the most important smallest rooms of the house... our laundry room. 
 This is what it looks like most of the time... dirty, gross, and with a random box of kleenex on the floor that I refuse to pick up because I know it will fall again.

Here is a prettier picture that the previous realtor took:
Hmm... well, not really much prettier...

Its a SUPER small room (about 4.5 x 7), right off our kitchen, that leads to the driveway and garage.

Here's a view from the kitchen
And no... those paper "frame holders" to the right are not still up... I took them down moments before our St. Patricks day party... so no worries.

And just for kicks, here are the stairs (on the left) that door leads to out from our laundry room, to the driveway/garage...
Thanks again for the picture realtor person!

But back to reality, here are some more awesome "before" pictures...
 More poop tootsie-roll brown flooring! HOORAY!
 And for storage? We had a teenie, tiny shelfing unit that I have been dragging around with me since my junior year at OU...
 Its uneven, it wobbles, its 6 years old... and like a toddler beauty queen, it was time for her to retire and be replace by some one thing cuter.

Another thing that had to go... the blinds... the cheap, $4 kind... they seriously make me cringe 
 Together, they equal one ugly 1.5ft of laundry room...
 We knew we wanted to redo the flooring and install awesome Traverine tile that we bought at the Granite and Marble Auction which we also put in my office a couple weeks ago, so taking out the washer and dryer was step 1... but where-o-where should we put the dryer?? The Kitchen??? GREAT IDEA!!!
Naturally...

Already looking better though!
Random Brackets on the other side of the wall? Yea, taking those down too...
Next was the Big Ol Washer... we had to unplug everything from the wall and were left with this...
Yeaaa... gross...

But then we had to find a home for our washing machine to live for the next couple days... Since the dryer had already staked his claim in the kitchen, our washer chose the dining room...
Yea, please dont pay any attention to the complete and utter mess around it... oh look! What a pretty chandelier! (distraction)
Back to our laundry room, Chris also started cleaning out the vent which leads all the hot air outside...
If you are eating anything, I recommend you stop because this is about to get gross right now...
Seriously, dry heaving right now...
After taking two pictures and refusing to come back until it was all picked up, Chris yelled at me down the hall "Hey, while we're at it, you think we should replace the baseboards? They're pretty bad".

I decided to take his word for it since I was NOT going back into Icky-Icky-Dirty Land and gave him the "Sure, why not".

Next thing I heard, was **Crack**Breaking Noise**... and "#^%$!!!" from Chris...
Apparently, when trying to remove the base boards, dry wall decided to come off with it...
Normally, this shouldnt happen...(duh)...No one wants to see pink insulation starring them in the face when moments ago we were talking about "just" baseboards.

Since this house is old (cirra 1940) and we have NO idea when this laundry room extension was added, we came to the conclusion there must have been a water leak from the washer some time ago and it had seeped into the walls...

The good news: no mold... Hooray!

The bad news: we were going to have to replace the drywall that was soft and falling apart.

Chris's Good News: He got to break out his wall saw...


Almost as though a bat signal in the sky was released with a picture of a hammer, Chris's dad showed up outta no where.
The "fix-it signal" may or may not have been Chris just calling his dad to come over and help with tile, but his timing was oddly appropriate that when we start tearing down walls, Chris's dad shows up... LOVE him...

They decided to remove all dry wall about 24 inches up from all three walls...


I wasn't freaking out or anything... no... i was FINE... cool as a cucumber... ... ... ... I may have had to been sedated...

It even looked like this at one point...
But after the smoke/dusty/drywall had settled, we were left with it looking like this...

Remember: this is DAY 1 of what should have been just a "tiling project"...
The next day, after leaving the house to avoid having a stroke every time I shimmied passed the drier in the kitchen and looking into the room, I came home to a MUCH better site...
WHOO HOO!!! No more holes in the wall... and the poop toosie roll flooring was being covered up!!... oh HAPPY freakin' DAY!!!!

I then broke out my best dancing moves, with camera in hand, in front of Chris to celebrate:
I'm convinced Seinfeld stole this dance idea from my mother... not. joking.

Thank goodness Chris just smiles at me when I act weird... I'm about 50% sure he knew what he was getting into when he married me...
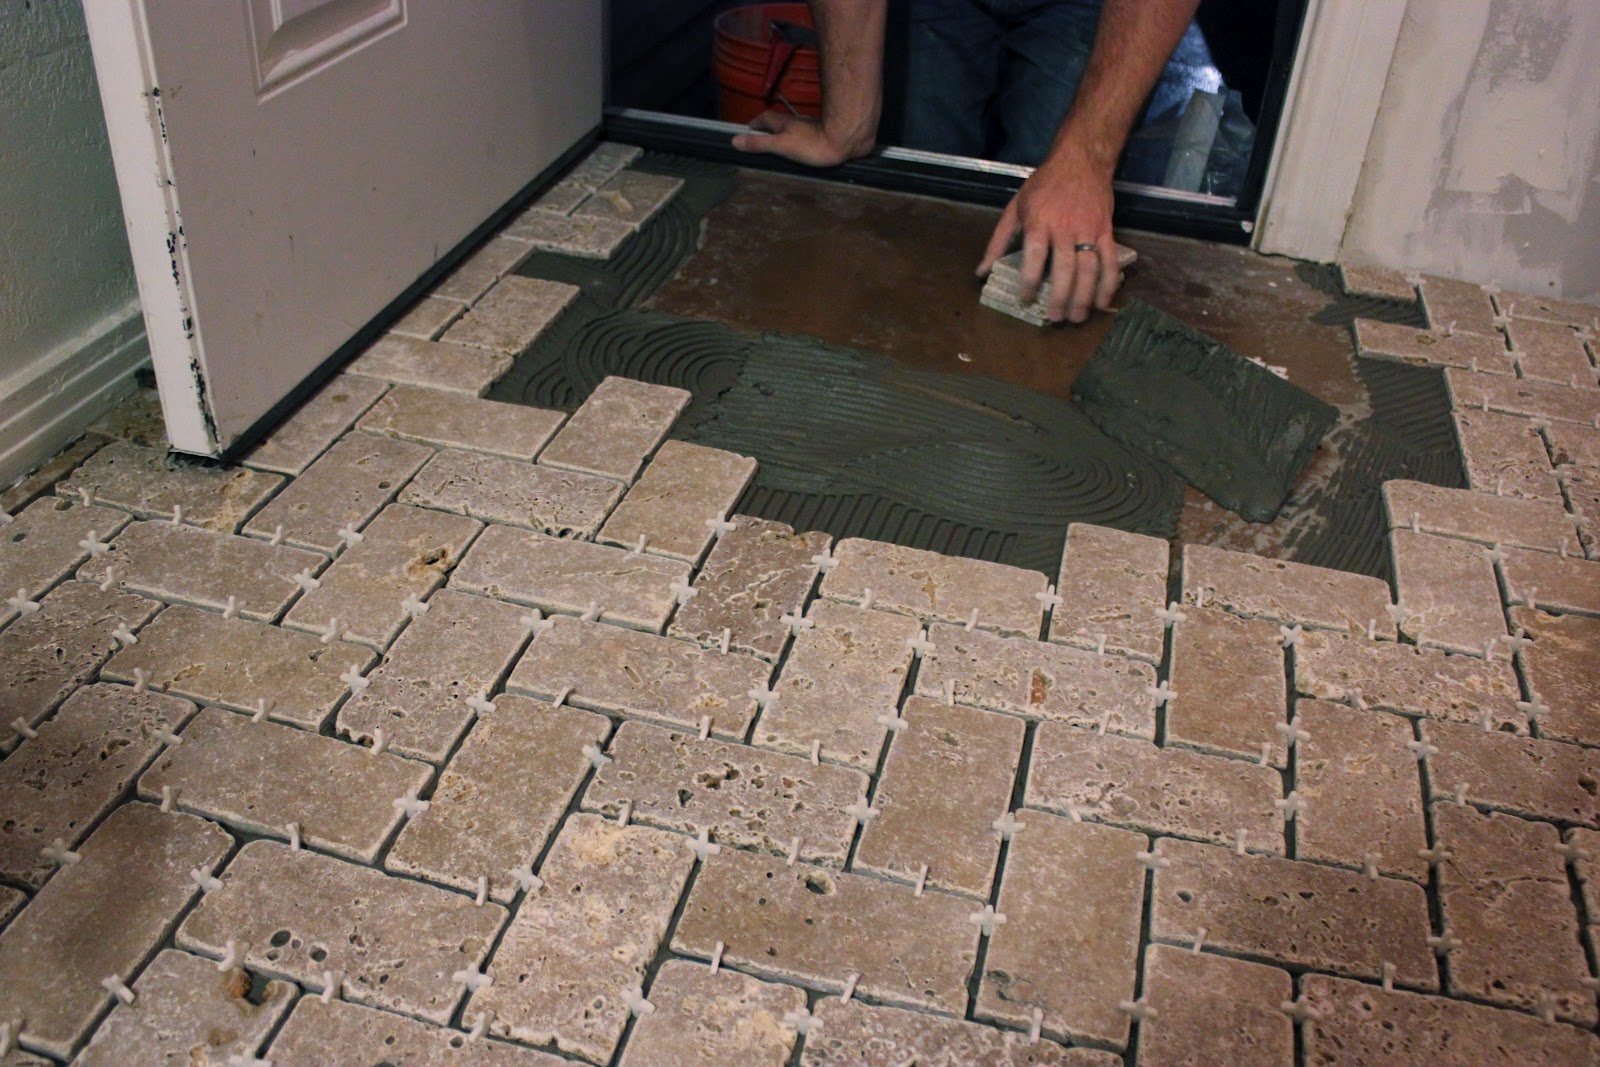
But back to the tiling...

And a quick look at what was giving me grey hair, at the age of 26, outside that little room...

Finally, just as when Chris thought the tile was about to beat him, we came to the finishing pieces...
And I use "we" loosely...

But the next day, hazah! it looked killer...

Oh laundry room, you get DOWN with your tiled self...
Alas, "we"... **cough**Chris**cough**... had to keep fixing the drywall so it didnt look so patchy...

And then came the grout....
To make it all pretty and finished...
Wax on, wax off my husband... wipe on, wipe off...

And the result? I mean, come on, really?... really? 
And the next day after I wiped off the haze, even better...
Again, Chris and I used an impregnating sealer to make sure we got deep down into the porous tile just in case there was any water issues in the future...

The next day? PAINT!!!
We decided on the same color as the kitchen...
Even though its a light grey, it made a WORLD of difference...

Still, even with the same paint trying to transition from the kitchen to the laundry, it was still missing something...
That something, we decided, is bead board that was in the kitchen that just STOPPED when it reached the laundry room...

So Chris and his dad pulled up the baseboards... this time without the wall attached...


And put up THIS beauty...
Even on the side wall

See... now the transition even looks a LOT more seamless...
Chris's dad also replaced the blinds...
See what a difference faux wood blinds make???
Oh and the bead-board looks amazing...
And lets not forget about the floor...

The only thing missing from this room now? Storage... and a blank spot to fill...
We had gone back and forth with what type of storage to put in here... We only had about 20" or so. Maybe some unfinished cabinets from Home Depot?
Home Depot Unfinished Cabinet
We thought it would have been pretty easy to paint and install some hardware on... BUT... we would also have to do all the work and after everything we've done so far (HELLO! we had HOLES in our walls!!!) we were looking for something that would require a little less effort on our part that was under $200.

Enter Ikea...
Picture from HERE
Now, I know what your thinking... Ikea? gross... its going to fall apart in a couple days/weeks and they are really poor quality... but when I saw this online, I figured it was at least worth a drive up to Frisco...
Pax Wardrobe
Almost the same thing as Home Depot, but already painted white and $70 cheaper...

And when I got to the store, I decided all the options we could put INSIDE were perfect for what we needed....
 Plus at 19" wide, 23" deep, and 93" tall it would be a perfect filler for that space...

The only dilemma? Picking out a door (... yea, it didnt come with a door,  you had to buy it separately... along with the hinges... nickel and dimed us a bit, but it STILL came out cheaper that the unfinished Home Depot version...)
I thought the door on the left would be a little more formal, but I kinda liked how the window one made it feel a little more open... and for such a tiny space, that would probably be the way to go.
Plus, you could build these little window boxes with it, which I thought was pretty cute.

****(I reserve this space for the 45 minutes it took for me to check out, put two 96" boxes (thats 8ft) which weigh 65lbs and 50lbs respectfully, in the car, by myself, IN THE RAIN... ... ... ... Lesson learned? NEVER go to Ikea by yourself... I may or may not have called Chris crying DEMANDING that a fresh margarita be waiting for me when I get home)****

The next day when we finally got it out of the box and put together...
yea, it barely fit at the top... but last time I checked, "barely" is still in...

Next stop, the door...
And the roll-out wire baskets (which I LOVE!!! great for dirty shoes!!)
Wire baskets
And all the drawers
Pax shelves
We wanted to make sure there was enough room height wise for what we needed... ie paper towels, toilet paper... detergent and cleaning supplies on lower shelves
lookin' good...
Did I mention how much I love our wire baskets??
Finally, I put back the window frame turned picture frame I made (as described HERE)...
Also put up Gus and Rocky's leash holders...
I dont know why Im so oddly proud about these, but I found these letters a while back at Michaels in the dollar bin then spray painted them yellow... might switch to a different color, not quite sure
Here's a better picture of how it looks now... and put together and what not...
The ONLY thing bugging me about the new pantry and the washer/dryer was the uneven balance...
Don't get me wrong, I LOVE the extra storage and since Chris and I are both over 6ft, we have no problem reaching things, but with the pantry being higher than the washer/dryer, it just seemed uneven.

Once again, enter Ikea....I forgot to take a picture when I was actually there... but here's what I found via their website:

It looks a little light in this picture, but it had some great earthy-tones to it so I figured I might as well try and see how two of 'em would look up top...
 AAANNNNDDDD I love them...
Self high-five...

I've decided I'll use it store a lot of my extra fabric and buralp I have hanging around the house... but I just love how it balances everything out and breaks up all the white a bit...
 Still not sure how I feel about the light (Chris REALLY likes it) and I really did too, but now that we have so much going on toward the ceiling, I'm thinking a can light maybe a little better and not as "squished" looking... who knows, it may grow on me...

But all in all, we're DONE!!! I know that was a super long post, but this project took at LOT longer than we original thought ("its just tile, we can do it in a weekend".... It took a FULL week)

But we LOVE IT!! We call it our "grown-up room"...  like grown-ups live here and not some 20-somethings playing house...

Maybe you just had to see how TRUELY gross it was before, but we like it love it are obsessed now.

And because you all have been waiting so patiently, here is the before/after picture....

Disclaimer: Sorry but the light in the laundry room is REALLY orange/yellow which makes it super hard to white balance and I'm still learning about my Canon Rebel T2i... I'll take better pics in the future I promise...

So what did you guys think?? Have you ever started a project then have part of the wall cave in on you? Do you think the bead board and the tile work together? Are you an Ikea hater but maybe willing to give it a second chance (we are SOO happy we did!)

I would love to hear from you all!!!

Like us on Facebook

Little House in the Big D

Flickr Images